
Now, it all started five Thanksgivings ago. Five years ago, on Thanksgiving.
We were living in England. Thanksgiving, like the 4th of July, is a sort of lonely holiday for Americans living in the old country. We were feeling it. The only remedy was an honest-to-God Thanksgiving feast, and so we would have one, I was determined.
But there was a problem: Thanksgiving dinner without pumpkin pie was not an option, but canned pumpkin does not exist in England. Prawn flavored potato chips, yes they have those, but cans of pumpkin, no. It was a serious problem.
That's when I started experimenting with butternut squash, and the evolving butternut squash pie was born. It was pretty good that first year, it did the trick for us homesick ex-patriots, and I've been slowly improving it ever since. We're back in the states, where every autumn towers of canned pumpkin spring up in all the grocery stores, but I can't go back - I reach for the butternut squash; we have a new Thanksgiving tradition now.
Here's the current version, with a gingersnap crust since 2012, and gluten-free for 2013. Maybe one year it will finally achieve total perfection, or maybe it will simply evolve forever, an ongoing testament to the surprise silver linings of exile and the rewards of experimentation.
Butternut Squash Pie
Makes one pie
Note: pie MUST be made one day ahead. Seriously.
1 8-ounce bag gluten-free ginger snaps
1/4 cup melted coconut oil
1 3-pound butternut squash
1 cup unsweetened coconut milk (not low-fat!!)
1 egg plus 2 egg yolks
1/2 teaspoon vanilla
1/3 cup sugar
2 tablespoons maple syrup
1/2 teaspoon dried ginger
1/2 teaspoon cinnamon
1/4 teaspoon nutmeg
1/2 teaspoon salt
Preheat oven to 350.
For the crust:
Break the gingersnaps into pieces and put in a food processor or blender. Process to make crumbs. Pour crumbs into a bowl and use a fork to gently stir in coconut oil. Press mixture evenly into a lightly oiled pie plate and bake for 4 minutes. Set aside to cool completely.
Roast the squash:
Cut the squash in half (don't remove seeds) and place cut-side down on a parchment-lined baking sheet. Bake for about an hour, until squash is soft and bubbling.

After squash is done, increase oven temperature to 425 for baking the pie.
Let squash cool. Scoop out and discard seeds, and then scoop out the flesh into a strainer and drain off any excess liquid for at least 10 minutes.
While squash is draining, whisk together coconut milk, eggs, egg yolks, and vanilla. Set aside.
Measure a scant two cups of drained squash flesh into a blender or food processor. Add sugar, maple syrup, ginger, cinnamon, nutmeg, and salt and blend well for about five minutes.
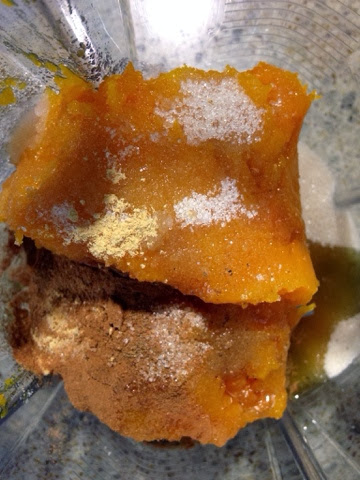
Add coconut milk mixture and blend until smooth and combined, about one minute more.
Pour into cooled crust and bake 15 minutes. Reduce heat to 350 and bake 50 more minutes. I noticed my crust started to brown a little too much around the edges - if this happens to you, just cover the pie with foil.
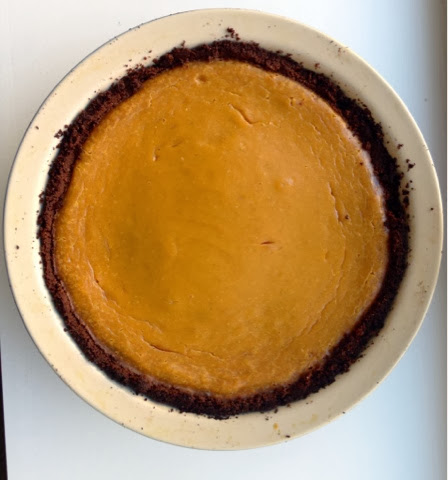
Let the pie cool at room temperature completely before refrigerating OVERNIGHT. I must stress this: you can't eat this pie the same day you make it. You will be robbing yourself. It totally transforms in the refrigerator, and it needs at least 8 hours. Honestly.
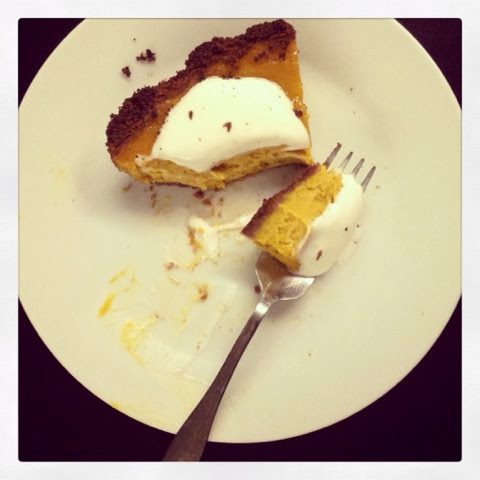
To have an amazing dairy-free experience, serve the pie with coconut whipped cream. Just put a couple of cans of coconut milk in the freezer until the solids and liquids are very separated, scoop out the solids, and put in a food processor with some sugar and vanilla. It will whip up beautifully and all the people with dairy allergies will worship you.

Happy Thanksgiving, friends.
