Monday, December 30, 2013

Delicious and Sustaining Meal for One in Only Nine Minutes: Vegan Ramen Deluxe


It very recently came to my attention that it's possible to buy ramen noodle soup with absolutely no weird crappy ingredients (like monosodium glutamate, powdered pig, or whatever), and I am going completely nuts for this stuff, doctoring it up with tahini, vegetables, cayenne pepper, seaweed, and toasted sesame seeds, and making the most fabulous quick bowl of vegan food ever. This makes a big lunch, but it is ONE degree fahrenheit in Chicago, and I need a big lunch. You probably do too.

Here's how it works:

Open up two bags of ramen (organic, if you can find it), take out those broth packets, thinly slice a carrot or two, chop some spinach (or use baby spinach, like I did), and if you have a bag of wakame or other seaweed, chop up a small handful, but the seaweed is optional.

You want everything ready to go, like when you're making a stir-fry.


Put 2 or 2 1/2 cups of water in a pot to boil (more if you want this dish to be soupy, less if you prefer saucy). When water boils, add noodles, carrots, and seaweed. Cook for four minutes, stirring occasionally, while you prepare the broth/sauce.

Combine 1 heaping tablespoon of tahini with the broth powder.


Add 1/4 cup hot water and whisk to combine.


Add tahini mixture to cooked noodles and vegetables, add spinach, stir well to wilt spinach and combine.


Top with toasted sesame seeds and a sprinkle of cayenne pepper.


Beware: once you try Vegan Ramen Deluxe you might have irrational cravings for it. Resistance is futile, believe me.

Monday, December 2, 2013

All the Leftovers Are Gone and the Sky is Grey: Spaghetti with Pecorino and Pepper


All the leftovers are gone. And the sky is grey. And you're kind of tired of cooking. But you don't feel like going out. And you want to eat something really good, not a frozen burrito.

I can relate. But don't worry; I've got you sorted here with this Roman specialty (from Rome via Moosewood Restaurant Cooks at Home). Pick up some Pecorino Romano cheese. Some parsley, if you want. Spaghetti, if you don't have a box already. I assume you have black pepper and olive oil. Once you've assembled these few ingredients, you are fifteen minutes away from a simple, delightful dinner.


Spaghetti with Pecorino and Pepper
Serves 2

1/2 pound spaghetti
6 ounces Pecorino Romano cheese (3/4-1 cup, grated)
1 tablespoon olive oil
Lots and lots of black pepper
optional: chopped parsley

While spaghetti is cooking, grate cheese into a bowl and add a huge amount of black pepper. 


When spaghetti is done, add to bowl and stir well. Add olive oil. Add parsley, if you're using it.


So easy. So good.

Saturday, November 30, 2013

Vegan Apple-Cranberry Pie with Crumb Topping


This is the pie that I make every year for Christmas with my in-laws, the one I wouldn't dare show up without. 


I made it this year for Thanksgiving when my oldest son Jonah brought his vegan roommate home for the holiday - but it's one of those recipes that non-vegans don't even notice is vegan, they just notice that it's festive and pretty and delicious.

It could be converted into a gluten-free treat by making a gluten-free crust, or by omitting the crust altogether and making apple-cranberry crumble, using gluten-free oats and oat flour. The filling and topping are amazing, and leftovers make my favorite Boxing Day breakfast.

Vegan Apple-Cranberry Pie with Crumb Topping
adapted from a recipe in Cooking the Whole Foods Way by Christina Pirello

Vegan pie crust for single-crust pie
5 medium Granny Smith apples, peeled and sliced thinly
Juice and zest of 1 lemon
1 cup cranberries
1 teaspoon salt, divided
1 cup maple sugar, coconut sugar, or unrefined brown sugar, divided
3 tablespoons arrowroot
1 teaspoon cinnamon, divided
1/2 cup brown rice syrup (or substitute maple syrup)
1 cup rolled oats
1 cup walnuts or pecans broken into pieces
3/4 cup flour
6 tablespoons melted coconut oil

Preheat oven to 350.

Roll out pie crust, fit into pie pan, and refrigerate while you prepare the filling.

Combine sliced apples, lemon zest and juice, cranberries, 1/2 teaspoon salt, 1/3 cup sugar, arrowroot and 1/2 teaspoon cinnamon. Mix well. Pour into pie crust. Drizzle rice or maple syrup over the top.

Combine oats, walnuts or pecans, flour, remaining salt, remaining cinnamon, and remaining sugar in a food processor. Pulse a few times. Transfer to mixing bowl, and drizzle in melted coconut oil. Stir with a fork to make a crumbly topping.

Spread topping evenly over apples and cranberries, cover pie tightly with foil, and bake covered for 30 minutes.

Remove foil and bake 25-30 more minutes, until topping is brown and filling bubbles.

Cool at least 2 hours before eating. Excellent with vegan coconut vanilla ice cream.


Tuesday, November 26, 2013

Nonny Fran's Noodle Kugel


When somebody gives you his grandmother's recipe, you need to first say thank you, vehemently, and you need to then get straight into the kitchen and start cooking. My friend Justin generously sent me this recipe after I expressed bitter envy about his reported late-night snack of noodle kugel, which really showed up my sad rice cake with peanut butter, and now I have a delicious kugel of my very own sitting in the fridge, ready for insomnia or hungry teenagers or snowstorms or whatever the night might bring.

I didn't mess with this recipe much, I just added a cinnamon/almond/butter topping (because what we really need here is more butter!). You could experiment with toppings, or just keep it simple/classic/elegant.

And in case I didn't say it vehemently enough already:  Thank you, Justin!

Nonny Fran's Noodle Kugel

8 ounces extra-wide egg noodles, cooked and drained
8 ounces whipped cream cheese
3/4 cups sugar
6 tablespoons butter, softened
4 eggs
1 cup milk
Extra butter or cooking spray for baking dish

Optional Topping:
1 tablespoon melted butter
1/2 cup slivered almonds
1/2 teaspoon cinnamon

Preheat oven to 350.

Butter or spray 2-quart baking dish.

Using a wooden spoon or a stand mixer, beat together cream cheese and sugar until light and fluffy. Add butter and beat to combine well.

In a separate bowl, whisk eggs. Add milk and whisk to combine.

Add milk and eggs to cream cheese mixture and whisk well to combine.

Spread cooled noodles evenly in baking dish and carefully pour contents of mixing bowl over noodles, pressing down gently if necessary to submerge noodles as much as possible.

For topping: Combine melted butter, almonds, and cinnamon and spread mixture on top.

Bake uncovered, 40-45 minutes, until solid and golden. Let cool completely at room temperature, then cover and refrigerate. Best served cold, in my opinion.


Sunday, November 17, 2013

The Evolving Butternut Squash Pie (Dairy and Gluten-Free)


Now, it all started five Thanksgivings ago. Five years ago, on Thanksgiving.

We were living in England. Thanksgiving, like the 4th of July, is a sort of lonely holiday for Americans living in the old country. We were feeling it. The only remedy was an honest-to-God Thanksgiving feast, and so we would have one, I was determined.

But there was a problem: Thanksgiving dinner without pumpkin pie was not an option, but canned pumpkin does not exist in England. Prawn flavored potato chips, yes they have those, but cans of pumpkin, no. It was a serious problem.

That's when I started experimenting with butternut squash, and the evolving butternut squash pie was born. It was pretty good that first year, it did the trick for us homesick ex-patriots, and I've been slowly improving it ever since. We're back in the states, where every autumn towers of canned pumpkin spring up in all the grocery stores, but I can't go back - I reach for the butternut squash; we have a new Thanksgiving tradition now.

Here's the current version, with a gingersnap crust since 2012, and gluten-free for 2013. Maybe one year it will finally achieve total perfection, or maybe it will simply evolve forever, an ongoing testament to the surprise silver linings of exile and the rewards of experimentation.

Butternut Squash Pie
Makes one pie
Note: pie MUST be made one day ahead. Seriously.

1 8-ounce bag gluten-free ginger snaps
1/4 cup melted coconut oil

1 3-pound butternut squash
1 cup unsweetened coconut milk (not low-fat!!)
1 egg plus 2 egg yolks
1/2 teaspoon vanilla
1/3 cup sugar
2 tablespoons maple syrup
1/2 teaspoon dried ginger
1/2 teaspoon cinnamon
1/4 teaspoon nutmeg
1/2 teaspoon salt

Preheat oven to 350.

For the crust:
Break the gingersnaps into pieces and put in a food processor or blender. Process to make crumbs. Pour crumbs into a bowl and use a fork to gently stir in coconut oil. Press mixture evenly into a lightly oiled pie plate and bake for 4 minutes. Set aside to cool completely.

Roast the squash:
Cut the squash in half (don't remove seeds) and place cut-side down on a parchment-lined baking sheet. Bake for about an hour, until squash is soft and bubbling.


After squash is done, increase oven temperature to 425 for baking the pie.

Let squash cool. Scoop out and discard seeds, and then scoop out the flesh into a strainer and drain off any excess liquid for at least 10 minutes.

While squash is draining, whisk together coconut milk, eggs, egg yolks, and vanilla. Set aside.

Measure a scant two cups of drained squash flesh into a blender or food processor. Add sugar, maple syrup, ginger, cinnamon, nutmeg, and salt and blend well for about five minutes.


Add coconut milk mixture and blend until smooth and combined, about one minute more.

Pour into cooled crust and bake 15 minutes. Reduce heat to 350 and bake 50 more minutes. I noticed my crust started to brown a little too much around the edges - if this happens to you, just cover the pie with foil.


Let the pie cool at room temperature completely before refrigerating OVERNIGHT. I must stress this: you can't eat this pie the same day you make it. You will be robbing yourself. It totally transforms in the refrigerator, and it needs at least 8 hours. Honestly.

To have an amazing dairy-free experience, serve the pie with coconut whipped cream. Just put a couple of cans of coconut milk in the freezer until the solids and liquids are very separated, scoop out the solids, and put in a food processor with some sugar and vanilla. It will whip up beautifully and all the people with dairy allergies will worship you.


Happy Thanksgiving, friends.

Thursday, October 31, 2013

Goat Cheese Ravioli with Puttanesca Sauce


I set out to make Ottolenghi's lemon and goat cheese ravioli, and veered off in a whole other direction, substituting wonton wrappers for pasta dough, and serving the ravioli with a puttanesca sauce (with a twist: fennel), instead of the tarragon/lemon/oil topping in his recipe. Maybe it's a sign that his hold on me is loosening, ever so slightly. At any rate, my straying paid off; there were honest-to-god moans of delight over this one. And it was a big, big problem that there wasn't enough for seconds.

Goat Cheese Ravioli with Puttanesca Sauce
Serves 3 (but leaves them all wanting more)

8 ounces soft goat cheese
Juice of 1 lemon
Hot red pepper flakes
Salt
Black pepper
5 tablespoons olive oil, divided
24 wonton wrappers
1 fennel bulb, trimmed and sliced thinly
1 14.5 ounce can diced tomatoes
3 garlic cloves, minced
1/2 cup pitted kalamata olives
4 teaspoons capers, drained
4 anchovy fillets, chopped finely
Parsley, minced

For the ravioli:

Mash together goat cheese, lemon juice, big pinch each of hot red pepper flakes, salt, and pepper, and 1 tablespoon olive oil.


Lay one wonton wrapper on a cutting board, brush around the perimeter with water, and add a heaped tablespoon of the goat cheese mixture in the center.


Top with another wonton wrapper and press firmly around the edge to seal.


Repeat until you've used up all the filling. I ended up with 12 ravioli. Put ravioli on a parchment paper-lined cookie sheet while you prepare the puttanesca sauce.


For the sauce:

Warm 2 tablespoons olive oil in a large skillet over medium-low heat. Add the fennel and cook about 15 minutes, stirring occasionally. Add the tomatoes, garlic, 1/2 teaspoon red pepper flakes, olives, capers, and anchovies. Simmer for 15-20 minutes. Add salt and black pepper to taste.


To finish:

Heat 2 tablespoons olive oil in a large skillet and cook ravioli, maybe 4 at a time, until browned and slightly puffed. It only takes about 2 minutes on each side.


Serve topped with puttanesca and parsley.

Sunday, October 20, 2013

Hardly Getting Over Ottolenghi: Caramelized Garlic Tart


Chef Ottolenghi had me at Shakshuka, but this garlic tart is what finally sealed my undying devotion. I am afraid to write any description of it, lest I further condemn myself to that special level of hell reserved for adjective over-users. I'll let the man himself sum it up:


I followed his recipe closely, except I didn't have fresh herbs and substituted dried, and I used phyllo dough instead of puff pastry because they were out of puff pastry at the store. The flakey phyllo was delicious - I think any kind of crust would work well. The recipe says it serves eight. Ha ha. Four of us devoured this easily.

Caramlized Garlic Tart
adapted with minor changes from Plenty by Ottolenghi
Serves 8 (not really)

3 whole heads of garlic
1 tablespoon olive oil
1 teaspoon balsamic vinegar
1 cup water
3/4 tablespoon sugar
1 teaspoon chopped rosemary or 1/2 teaspoon dried rosemary
1 teaspoon chopped thyme or 1/2 teaspoon dried thyme
8 sheets phyllo dough, thawed
Olive oil or cooking spray for phyllo crust
4-5 ounces soft, creamy goat's cheese
4-5 ounces hard, mature goat's cheese
2 eggs
1/4 cup heavy cream
1/4 cup créme fraiche
Salt and black pepper

Preheat oven to 325

To caramelize garlic:

Separate and peel all the cloves, put them in a small pan, cover with water, bring to a simmer, and blanch for three minutes. Drain.

Warm olive oil over high heat, add garlic, and fry for 2 minutes. Add vinegar and water, bring to a boil, and simmer for 10 minutes. Add sugar, herbs, a pinch of salt, and continue to simmer until most of the liquid has evaporated and the cloves are coated in a dark syrup. This is the hardest moment of making this recipe. You will want to eat all of these incredibly tasty garlic cloves. Show some restraint. But no need to be a saint - eat ONE, go ahead. Set the rest aside.

Prepare the phyllo crust:

Lightly oil a tart pan or pie plate and layer the phyllo sheets, brushing each layer with olive oil (or spray with cooking spray - easier but not quite as yummy). There will be substantial overhang, which you should trim with scissors down to about an inch. Roll this overhang in to form a rim. It doesn't need to be perfect.

Break the cheeses into big bite-sized pieces and scatter into the phyllo crust. Add the garlic and every bit of its syrupy coating.


Whisk together the eggs, creams, 1/2 teaspoon of salt, and generous pinch of pepper.  Pour over everything.

Bake 45-55 minutes, until the filling has set and the top is nice and brown.

Let the tart cool a little before serving. But rest assured your adoration of Ottolenghi will not be cooling. Not at all. I'll be making his lemon and goat cheese ravioli next, so please stay tuned.

Sunday, October 6, 2013

Ratatouille (Vegan)


The honeymoon's not over for me and Ottolenghi. I am cooking my way through select recipes from his cookbook Plenty, and every, every single thing I make turns out to make people sigh and swoon. Seriously. He is a genius.

Last week I insisted that my oldest son Jonah come home for dinner, the first time since he moved into his dorm in Chicago's South Loop. I thought for days about what to cook. I wanted it to be something with an absurd amount of vegetables - surely he wasn't eating enough fresh veggies on his meal plan. To be honest, I kind of haven't been eating enough veggies on my meal plan. Part of our living in-residence deal is that my family and I can eat in the dining hall, and on many weeknights we take advantage of this perk. The food is reasonably good, and we're eating vegetables, of course, but it's not like the homemade/made with love/ usually-organic fare that I put on the table on my best nights. 

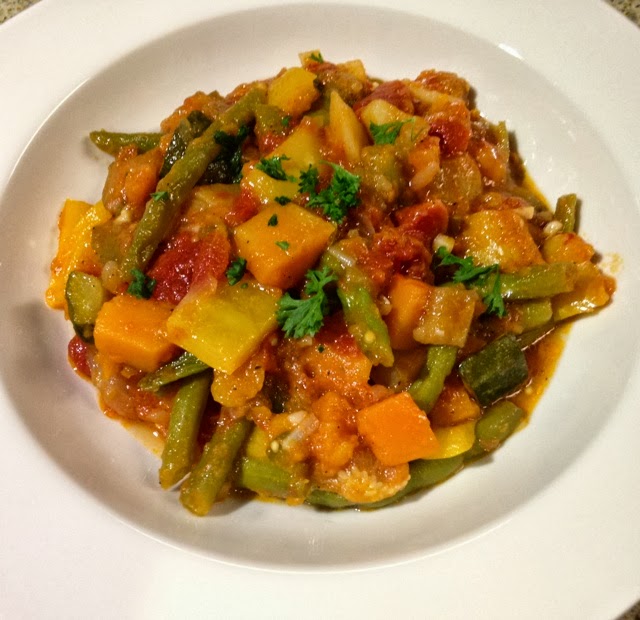
So I wanted dinner with Jonah to be this - the best of the best. We have always loved ratatouille, and when I read Ottolenghi's take on the classic- with parsnips! hot pepper! butternut squash! green beans! - I knew it would be something special and exactly what I was looking for.

The amount of chopping was daunting. I put Henry to work on garlic and onions, Jake peeling potatoes and prepping beans. I think prep work should be a family affair; sharing the chopping makes cooking more fun and less laborious. Give your children knives, people! With the three of us on task we had a massive pile of vegetables ready to cook in minimal time, and then I started the process of frying, simmering, and finally roasting this thing into deliciousness. 

It was great to see Jonah. He devoured two enormous servings of ratatouille, and thus satisfied that I'd given him about a week's worth of vegetables and a month's worth of motherly love, I hugged my son and off he went, well nourished.

Ratatouille
adapted from a recipe in Ottolengi's Plenty
Serves 6-8
*note: dice all vegetables into similarly-sized (approximately 1-inch) pieces

6 tablespoons olive oil, divided
1 large onion, diced
6 cloves garlic, minced
1 small jalapeño pepper, seeded and thinly sliced
4 red and/or yellow peppers, diced
1 medium butternut squash, peeled and diced
2 parsnips, peeled and diced
1 lb. green beans, trimmed
2 zucchini, diced
1 large eggplant, peeled and diced
2 medium potatoes, peeled and diced
1 28-ounce can fire roasted tomatoes
Big pinch sugar
2 tablespoons tomato paste
Salt and pepper
Chopped parsley or cilantro to garnish

Warm 2 tablespoons oil in a large heavy pot over medium-high heat. Add onions and a tiny pinch of salt and cook 5-10 minutes. Add garlic, jalapeño, and peppers, and cook 5 more minutes. Add squash and parsnip and cook 5 more minutes.

Use a slotted spoon to scoop vegetables out and into a bowl (leave as much oil in the pot as possible). Add remaining 4 tablespoons of oil and cook green beans, zucchini, and eggplant for 5-10 minutes, stirring occasionally. 

Return the other vegetables to the pot, add potatoes, tomatoes and their juices, sugar, tomato paste, and lots of salt and pepper to taste. Add water to half-cover everything, stir well, bring to a boil, and reduce heat to a simmer for 30 minutes. Taste and add more salt or pepper if necessary.

Heat oven to 400. Scoop vegetables out of pot and into a roasting pan. Pour in the cooking liquid, and bake 30 minutes, until liquid cooks off. Vegetables should be very, very soft. As Ottolenghi writes, "overcooking the vegetables is the whole point here."

Serve with plain white rice. Garnish with parsley or cilantro. 

May cause swooning in you and others.

Tuesday, October 1, 2013

Feeding Freshman

warm cookies on move-in night


candy apples for the first day of classes

hot mulled cider, every sunday night

donuts - to go with the cider

Wednesday, September 25, 2013

Dr Shakshuka

I've been thinking of how to distill the insights I've acquired over these past few years of trying to teach my sons how to cook.

You know, some kind of essential truth, like: "Keep it simple, stupid."

Or, "The secret ingredient is love." (Although Marge Simpson was closer to the truth with, "The secret ingredient is salt." The secret ingredient IS salt.)

But after much consideration I've decided that the best single aphorism I can pass onto my children, the best piece of advice I can give them as far as making food is this:

"Put an egg on it."

It always works. Put an egg on top of anything, it makes it better.

Enter Shakshuka. Shakshuka, what a lovely name. I could say it all day. I could make it all day. And I could definitely eat it all day.

I found the recipe in a pretty little recipe booklet than came with my Sunday paper one week, years ago when I was living in the UK. The British Sunday papers were competing vigorously for sales, and so included all kinds of prizes with your purchase. I still have a gorgeous black and white photo print of John Lennon that came with one edition, and a DVD of Jane Campion's The Piano that came with another.

But best of all I have this:


It's an amazing tiny treasure-trove of innovative vegetarian dishes excerpted from the cookbook Plenty by the brilliant, brilliant Ottolenghi. Go buy it right now. You're welcome.

I lost this treasure for a while, and found it during my recent move. You never know what you're going to unearth when you are packing books.

Now that it is back in my hands, I plan to cook my way through it. Kind of like Julie and Julia, but with 15 recipes.

I started last weekend with Shakshuka. I was sick for the millionth time this year, and wanted to eat something restorative and spicy. I reached for Ottolenghi, and read this: "In an alley in old Jaffa is a little restaurant with shared tables outside. It's heaving at lunchtime and everybody, more or less, eats the same thing. The place is called Dr. Shakshuka, after its signature dish, a North African specialty." A tomato, pepper, and onion stew, spiced with cayenne, saffron, bay leaves and thyme. Topped with eggs.

Dr. Shakshuka. That's what I needed.

I followed the recipe very closely, and it doesn't seem right to publish it here, so follow this link to The Guardian website for a video and the recipe. If you don't have any saffron in the house, you need to get some. You might need to sell something to raise the money to buy the saffron, but do it. It's worth it.

I'm just wild about saffron.
The dish was rich and satisfying, and it didn't cure my cold but it did make me feel much better.

Thanks, Dr. Shakshuka.

Put an egg on it.

Monday, September 16, 2013

Mac and Cheese for 23


For the first time in my life I live in a dorm. To be more precise, I live in a beautiful, spacious apartment in a dorm, and I live in it with my partner and son, and I'll be doing work in residence that I am sincerely excited about, but still, it's in a dorm, and this is something new. The reality is starting to sink in that tomorrow three hundred college students will join us in the building. Life is getting interesting.

Before the new students arrived, we hosted our first big event as faculty-in-residence: a dinner party for the residential student staff. I had planned to order catering, but as the day approached I couldn't quell my nagging urge to set out a spread of home-cooked food, the kind they won't be getting in the dining halls.

So here's what we did: we made three huge trays of macaroni and cheese, four roasted chickens, six oversized bunches of kale, and a couple of gallons of iced tea. Before they arrived, I fretted that I'd made way, way too much food, and wondered what on earth I'd do with all the leftovers. Once they arrived, pouring into our apartment all bright, shiny, and confident, I hustled to finish everything while they drank iced tea and made themselves at home. One young man, a fellow food-lover who immediately planted himself in the kitchen, commented casually that macaroni and cheese is the hardest thing to make well. This made me fret further, thinking for a moment that not only had I made too much, but it might not even be good enough.

My fretting about potential leftovers now strikes me as hilarious, and you might be laughing too, if you've ever fed a 19-year-old person, much less twenty of them. They ate every bit of everything, even the kale, with gleeful abandon. It was deeply satisfying and incredibly fun. I have a reliable macaroni and cheese recipe, but I have to confess that it's copied almost entirely from The Grit Restaurant Cookbook. The Grit is a wonderful vegetarian restaurant in Athens, Georgia, a food oasis beloved by many, including touring musicians (like myself, in a previous life) for its array of healthy and comforting food. Macaroni and Cheese lies far on the comfort end of the spectrum, with more butter, eggs, and cheese than we should probably be eating, but what's the point of trying to health-up mac and cheese? It should be creamy and rich and make you feel like somebody cares. It felt like a bit of a risk, making homemade food for this big bunch of students (having people over to your house for dinner is aways a risk though, you could burn the food or not have enough or your guests could hate what you make), but we will be working together all year, and cooking simple homemade food for them seemed like the best way I could communicate that I care. What better way to start off this adventure?

Oh, and our food-loving young man ended the night by declaring that the macaroni and cheese was perfect. And he asked for the recipe. So he can give it to his mother.

I think we're all going to get along just fine.

Macaroni and Cheese
Serves 8 as a substantial side-dish
Multiply accordingly for big groups

1 lb macaroni
6 tablespoons butter, divided
2 large eggs, beaten
4 cups whole milk
1 teaspoon dry mustard
2 teaspoons salt
pinch black pepper
pinch cayenne pepper (try a big pinch)
6 cups shredded cheddar cheese
1 1/2 cups panko breakcrumbs

Preheat oven to 425. Grease a 9 X 13-inch pan

Cook macaroni in a large pot, 8 minutes. Drain well and set aside.

While macaroni is cooking: whisk together in a large bowl the eggs, milk, mustard, salt, black pepper, and cayenne pepper.

Melt 3 tablespoons butter in the same pot, add drained pasta and stir well. Add egg/milk mixture and all the cheese. Stir constantly over medium-high heat until cheese melts and milk and eggs begin to thicken. Continue to cook and stir, at least 5 more minutes (probably more like 15), until mixture is very thick and creamy. Transfer to prepared baking dish.

Melt 3 tablespoons butter in saucepan and add breadcrumbs, stirring well. Spread breadcrumb mixture evenly over the top of the macaroni and cheese and bake 10- 15 minutes. I like to broil it at the end to brown the top.

Don't expect leftovers. 

Wednesday, September 4, 2013

So Goodbye Yellow Linoleum Kitchen


It wasn't a fancy kitchen, or a pretty one, but for two years I cooked many many meals in it, both with my kids and without. I made a lot of pies, a lot of granola. It was a comfortable kitchen, an easy place to try things and play, to experiment and make messes. I was never afraid to go a little wild in there, never felt like I had to constrain my kids or worry that they were going to ruin anything.  I didn't stress when Henry woke up one morning and made a big batch of french toast all on his own, or Jonah came home in the wee hours and cooked himself some crazy egg and avocado concoction.

I liked the window, too - most of the best pictures that Henry has taken for this blog were of plates of food on that white window sill, with morning light streaming in, and the beautiful garden behind the building in the background.

When you move out of a place, you leave a little bit of yourself behind. I happen to know that we were one of many happy families to live in this apartment, to cook in this kitchen, to watch kids eat and grow up and move on. The place had some seriously good vibes when we moved in, and I hope we built upon those vibes for the guy and his sons who just moved in after us.

We've moved into an apartment in a residential community (okay, just say "dorm") on the Northwestern University campus to be faculty in residence. The apartment is new and deluxe, the kitchen is the nicest one I've ever had in my life, by far. You'll be seeing our marble countertops soon, and for the next three years, but I wanted to pause for a moment to say goodbye to the yellow linoleum that served the Lovesmiths so well.

Saturday, August 31, 2013

Teach Your Parents Well: Guacamole


It's a pretty worn-out cliche that we learn from our children, blah blah blah, but of course it's true, we do. For example my children have unintentionally taught me how to feel deeply inadequate and desperately guilty.

I assume this is universal and unavoidable, so I'm not too concerned, nor am I constantly plagued by these feelings, but they are there and seem to intensify around life's milestones, like dropping a kid off at a dorm, or dropping another off for his first day of high school. At times like these I tend to mull over my mistakes; the stupidly missed windows of opportunity, the wrongheaded strong-arming, the unnecessary misunderstandings. That kind of thing.

It can get a bit overwhelming, so to cheer myself up I've been digging around for redemption, looking for the things I've done right as a parent.

Here's one: My sons both make great guacamole. So how bad a mom can I be, right?

As a matter of fact, I learned something else from my kids this summer besides inadequacy and guilt. I learned how to make better guacamole. Jonah had a summer job at Whole Foods, and part of his responsibilities included making dips. We recently had friends over for dinner, and Jonah made a huge bowl of guacamole. It was a big hit, and I had to admit, it was superior to mine. I asked him for his recipe, but of course he didn't have one, he just chops, mashes, and tastes until it's right. But he showed me how, and it was one of my better moments of the summer, getting a cooking lesson from my oldest son.

It goes something like this:

Guacamole
Mash 1 avocado per 2 people
Add lemon juice and salt to taste (lime juice is also good)
Chop tomatoes, cilantro, onion, and jalapeño, and add to avocado until it tastes really good.

Tuesday, August 20, 2013

Roasted Tomato and Jalapeño Sauce


In August I feel an intense obligation to eat as many fresh tomatoes as possible and to constantly explain to my children why they should feel the same urgency. This recipe arose from these conversations, and from Henry's current obsession with jalapeño peppers. It is the easiest sauce in the world to make. The less you mess with it the better - just let everything roast in the oven for a full 50 minutes, undisturbed, while the vegetables transform into even more concentrated and flavorful forms of themselves.

Roasted Tomato and Jalapeño Sauce
adapted from a recipe in The Voluptuous Vegan by Myra Kornfeld

7-8 medium tomatoes, stemmed and halved
1 - 2 onions, thinly sliced
1 - 2 jalapeño peppers, stemmed, seeded, and halved
5 - 6 garlic cloves, unpeeled
1/4 cup olive oil
1 teaspoon salt
1/4 teaspoon black pepper
1 tablespoon dried thyme, oregano, or combination of both. Or use fresh herbs if you've got 'em.

Preheat oven to 375.

Spread onions across the bottom of a 9 x 11-inch baking dish. Top with tomato halves (cut side down), jalapeños, and garlic cloves. Drizzle olive oil over everything and sprinkle with salt, pepper, and herbs.

Roast uncovered, 50 minutes.

Squeeze garlic from skins, and toss garlic into a blender. Use a slotted spoon to scoop out tomatoes and onions into blender and blend until smooth, adding liquid from baking dish as needed to get the right consistency.

For superior texture, press the sauce through a mesh strainer. It will still be good if you don't do this.

Taste and add a little more salt and/or pepper if you want.


Tuesday, August 13, 2013

White Bean Chili with Roasted Corn and Poblanos

This chili requires several steps and multiple pots and pans, and it will leave your kitchen wrecked, unless you're better than I am at cleaning up as you go. But I've never felt so in-tune with the late summer harvest: roasting corn, toasting pumpkin seeds, scorching and peeling poblano peppers, it's about as ritualistic and satisfying as cooking gets.

Part of my plan here was to teach Henry how to roast peppers. Unfortunately, I was a terrible model. I grew impatient with the process, like I always do, and didn't blacken them enough or steam them enough, and wound up grumpily scraping off little bits of tenacious pepper skin until I finally gave up and left tons of skin on.

It was fine. The end result was smoky and delicious, and provided an opportunity to teach my son that you don't have to do everything perfectly right to produce a damn good bowl of food.

Anyway, late summer is short - maybe too short to worry about peeling every piece of skin off a pepper.

White Bean Chili with Roasted Corn and Poblanos
Serves 6-8

1 lb small white navy beans, sorted, soaked, rinsed, and drained
4 poblano peppers, roasted and peeled (good tutorial here - I used a little olive oil instead of cooking spray)
4 medium ears corn (in husks)
1/4 cup olive oil
1 medium onion, sliced
4 cloves garlic, chopped
1 tablespoon dried oregano
2 teaspoons cumin
1 teaspoon salt
Big handful cilantro, leaves pulled off, divided
2 tablespoons fresh lime juice
8 ounces soft goat cheese (optional)
2 tablespoons milk (optional)
Big handful raw pumpkin seeds

To cook beans:

Place in a large pot with six cups cold water. Bring to a boil, cover, reduce to strong simmer, and cook one hour or so, until beans are cooked tender but not mushy. Check regularly to make sure beans are immersed in water - add more if necessary.

Meanwhile:

Roast and peel the poblano peppers (link to tutorial above). Chop roughly and set aside.

Roast the corn (keep husks on) in 350 degree oven for 30 minutes. When it's cool enough to handle, husk and use a sharp knife to scrape off the kernels. Set aside.

Warm olive oil in a large pot over medium heat. Add onions and a small pinch of salt. When onions sizzle, reduce heat to low and cook ten minutes, stirring occasionally  Add garlic, chopped roasted poblanos, oregano, cumin, salt, and about half the cilantro leaves. Cook five minutes, stirring.

Scrape every bit of olive oil/onions/garlic/poblano mixture into a blender. Scoop out 1/2 cup or so of bean cooking liquid and add to blender. Blend well - at least 1 minute. You will have a gorgeous green saucy paste. It will smell so good you won't believe it. Add more liquid if necessary. Stir mixture into beans.

Add corn and lime juice to beans. Taste and adjust seasoning, and simmer over low heat 15 minutes. Stir occasionally to ensure beans don't stick or burn. You might need to add a little more water.

Roast the pumpkin seeds by stirring in a dry skillet over medium-high heat until they pop and smell toasty. This demands constant attention.

Warm milk in a small saucepan over medium-low heat, add goat cheese and stir constantly to make sauce. (To make dish vegan, omit goat cheese sauce and top chili with vegan sour cream or yogurt substitute).

To serve: Ladle chili into a bowl, spoon a few tablespoons of goat cheese sauce on top, add pumpkin seeds and cilantro to garnish.

Harvest time. Coming soon: Roasted Tomato and Jalapeño Sauce!

Thursday, August 8, 2013

Buttermilk Biscuits


Two years ago today I lost my Grandma Violet. Nobody will ever love me as absolutely, as unconditionally. The last thing she said to me, a few weeks before she died, was "see you next time."

I think I know what she meant.

I see her every time somebody generously gives me the benefit of the doubt, deserved or not, or every time I follow her example, and muster up the energy to care for my family when I don't think I quite have it in me.

And I see her when I make biscuits. Hers were the best, and she made them for me whenever I visited her in Nashville, Tennessee, even when I arrived with an entire rock band in tow. Mine will never compare to Violet's, but she never did anything but praise and encourage me, and she believed until the end that it was at least possible for her Yankee granddaughter to make a good biscuit. And so I try.

See you next time, Grandma.


Buttermilk Biscuits

2 cups self-rising flour
1/2 cup shortening (or unsalted butter)
2/3 cup buttermilk plus 1-2 tablespoons, if needed

Preheat oven to 425.

Work shortening into flour with your fingers or a fork, quickly and lightly.

Stir in buttermilk until dough comes together. Add a little more buttermilk if you need it.

Turn onto floured surface, fold and knead briefly, and press into 1/2 inch (or a little more) thick rectangle.

Use a biscuit cutter to cut rounds and place on un-greased baking sheet, one inch apart.

Bake 8-12 minutes, until golden brown.

Best hot.